Showing posts with label decorations. Show all posts

Monday, December 17, 2018

Motivation Decorations


  Its time to talk about decorations!  We all have different styles and a personal preference to textures, patterns and shapes but what we all like or could use is a little more motivation, inspiration or encouragement in our lives.  It might not even be for ourselves but for other family members or it's just a great saying in general that needs to be posted.


   I found several choices at artsyolive.com!  This site was easy to navigate and whether your looking for a biblical message or a motivating quote they both are available.  There are even some personalized prints available.

  I like that your not only able to personalize a print but, that your also able to select a frame.

I had the choice of a couple frames and I chose the basic black frame.  It was a thick durable frame

It even came with it's own hardware which is nice for hanging it up in a timely manner instead hunting for the pieces.


The packaging was thorough to include packing peanuts as well to keep my print safe. 


I am completely satisfied with this product and service.  The whole experience was easier then i thought.  I think the hardest decision was which print to select and the frame.  I chose this print because I liked the phrase as well as the colors on it.  

Delivery was fast and I actually even had a follow up email to ensure I did want the passage on the bottom.  There is still time to order yours in time for a gift for this holiday season as well.  Feel free to use code Blog15 for a 15% discount!  This code is available through the 30th of this month.  While your waiting for your print you can also try your luck with this giveaway! Click here for that! 

I was provided a complimentary item for review purposes.  However all opinions stated were solely my own.


Monday, October 2, 2017

DIY Fall Swag


  Tis the season to bring some nature inside.  I  haven't been privileged the fall colors yet so I chose to work with artificial leaves.  I picked up the leaves and the raffia from the dollar store.

  For this project I used:


 Raffia and artificial leaves.


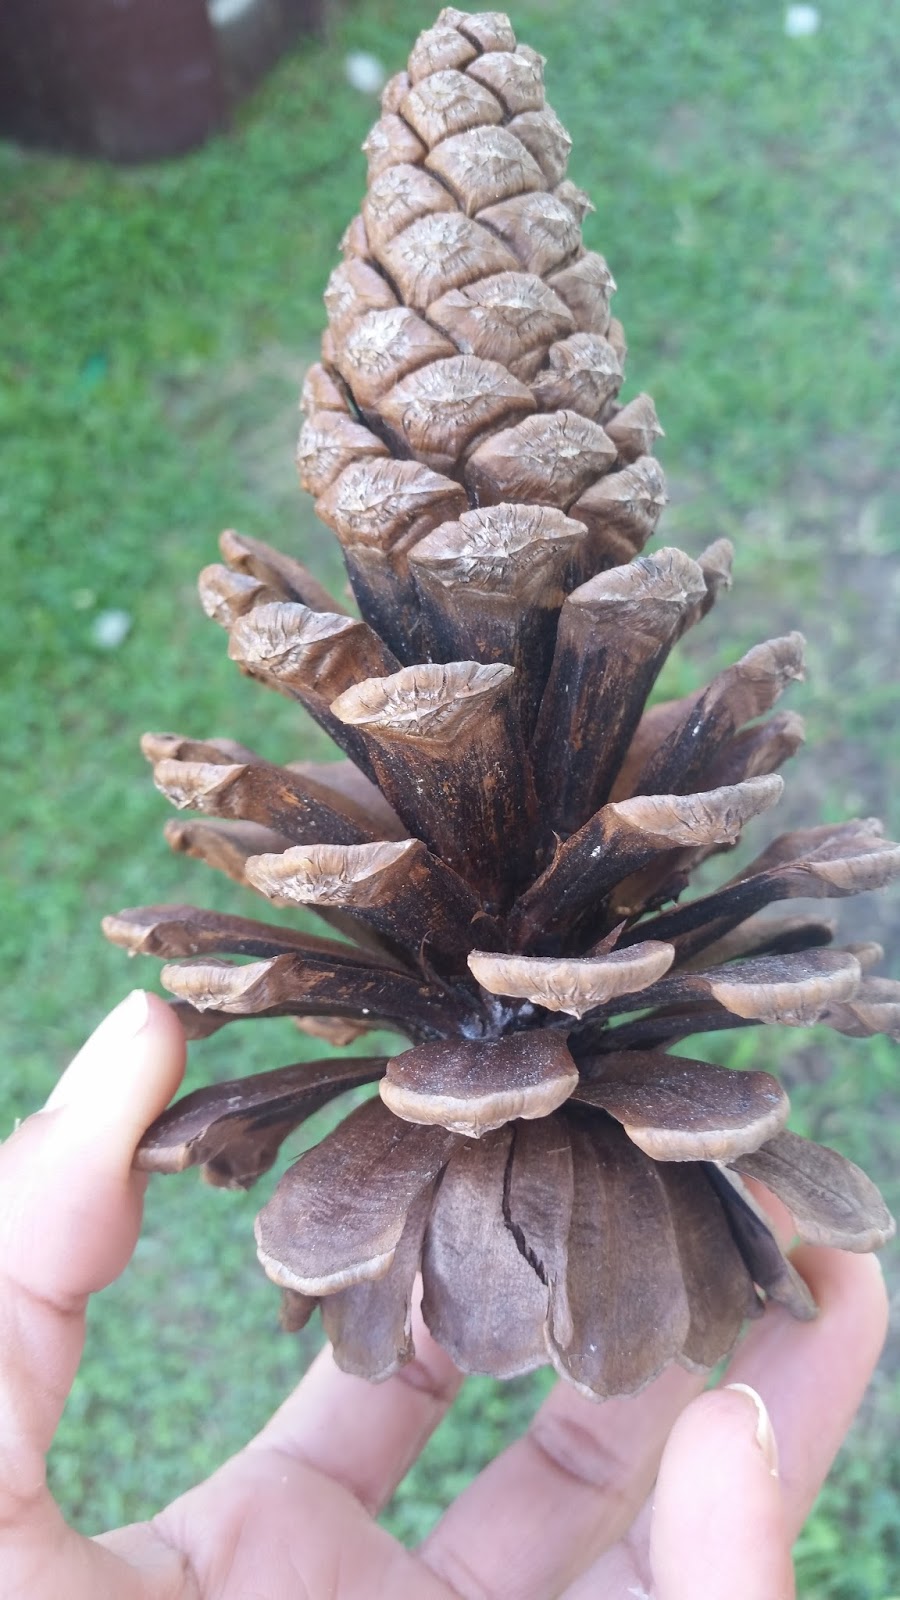
Pinecone

Pick a pinecone that is open all the way.  That way you can stagger your leaves.

I poked holes in the leaves tied a knot and hot glued the raffia to each leave to keep them secure.  I cut the raffia in various lengths to give the look more depth.


After I had all the individual leaves glued to the raffia I glued it to the pinecone in different areas.


Your quantity of leaves is your personal preference.

I tied another piece of raffia around the top, glued it and that's how I have hung mine.


For $2 and some nature it's not a bad display.  I could have made two and put one on each side of the curtain for decoration too.

Have you started decorating for fall?  Do you make some decorations with nature?

Thursday, October 20, 2016

Mummy (craft)


  When it comes down to it decorating is fun.  Arts and crafts are fun; so why not combine the two when you can.  What makes your decorations good are making them yourself.  This cuts down the cost and opens up the door to so many possibilities.  What's even better is its free if you can manipulate what you already own to create crafts or decorate.

  We worked on a couple mummies.  The kids were able to make them by alone with little help from me.

  For both of these crafts you will need toliet paper.  Everyone should have this supply on hand and you can still use some of it off one project if need be.  (Just in case it's an issue that your using it.)

We decorated our door first.  I started this last year with a snowman and it just kind of makes you smile when  you see a decorated door.  It is an inside door so it lasts for as long as you want since it's avoiding the outside elements (that's something to think about in your future door decorating)


  Just randomly criss cross your toliet paper across the door.  I used tape to secure it every once and awhile.  Of course add some eyes to it peeking out for more personality.

  The next mummy we made we all had our own empty toliet paper roll and toliet tissue.  Take shreds of the paper and glue them to the tube.  Shreds make it more realistic and don't worry about covering the whole area.


  Add some eyes and lips if your my kids.  Each mummy should represent itself don't you think?  I guess mine is a boy as it doesn't have eyelashes like my daughters.

  They make cute little easy to make projects and as cheap as they are you can make a dozen to decrate your house.  These would make a great Halloween project for kids.

Friday, October 14, 2016

A Boo Craft


  Time on my hands and a desire to craft and make decorations for Halloween had me whip up a ghost.

  First up is another dollar store craft.  It started with a small plastic gourd.


  Paint the gourd white

 and apply your face.


I used a sharpie but any marker should work as long as you wait for the paint to dry.


  I thought he needed some flair so I tore up some toilet paper and glued it around the bottom of him.  I tried a coffee filter first which didn't look that bad uncut it gave the appearance of a ballet dancer.  Tissue paper or hek if you paint your ghost grey, newspapers would look neat.

  I have thought of many possibilities for him.  He could have holes drilled in him and make a neat banner, float them off your overhead lights over your table or you could even hang him outside cautiously.

  This is a neat and fast way to make a unique ghost.  Another dollar store craft to save some money and decorate for Halloween.


Boo.

Thursday, September 22, 2016

Festive String of Lights (review)


  Although summer is officially very there's still time to hang out and socialize outside.  More time can be spent outside in more comfortable conditions because the summer heat is considerably lower as well.

   Hanging out with your friends or family on your patio or poolside just got better with these festive lights.  These lights are solar powered which greatly helps if you don't have a outlet readily available or nearby.  The lights come with a stake of which you can leave in the ground to obtain your solar power.  Of course the lights can be used in your home too.  They don't take up very much room and if you decide to leave them up just make sure there is a window to charge the solar pack.


  The lights are a nice soft light in primary colors.  The solar box allows you to turn on and off the lights as well as change the mode of the lights from constant to blinking lights.

  The lights were ready to use out the box once you unraveled them.  Think of unravel like folding a map back after you opened it. You are able to string them however you see fit and have some leftover cord to hide the solar pack if you desire.  The dragonflies are made of plastic.  You can see detail in them both with the lights on or off.  They are space evenly apart so you can see all the colors without appearing like a blob.


I received this product for free for review purposes and all opinions are my own.


To find out more about this product or order click here.

Monday, July 4, 2016

Stars without stripes (Day 3 Pinterest Challenge)

   Ok, so I am almost caught up!  I have all the projects done it's just a matter of writing up the posts.

  In keeping with the red, white and blue theme for Independence Day I made this project of stars.  This project could partially be done by kids but I did this one by myself.

    First off everyone has a box of crayons like this right?


Well, you will still have your box when your done.  I only used 2 crayons.  1 red and 1 blue and it made 11 stars!  Depending on where your going to use them and how many you need will determine how many more crayons you will need.

  Peel the wrapper off and shred the crayon.


  Place it in wax paper sealed around all the ends and cover with parchment paper.  Iron the crayon filled papers.


Draw your desired shape and cut them out.

I punched holes in mine and tied string to them.

The stars can be hung anywhere and made in any color.  Make some for a birthday or special occasion.  I hung mine up in between two rooms.


I love how these turned out.  They look really cute.  I can almost see a different shape seasonally.  Dangling down a mantel, as fringe or a banner.

Older kids could probably help with this craft if not using the iron they could cut the shapes.

  Can you see yourself making these in your future?  I would say this is a #pinterestwin!

Friday, January 8, 2016

Diy Project


One of my last DIY projects from last year sparked my interest in making the upcoming 2016 year a more hands on kind of year.  I wanted to expand and challenge my capabilities.  I shared with you the ornaments I made and I wanted to show you another type of ornament I made.

  For this upcoming project you needed some basic supplies.


  A glue gun, extra glue is always a good thing, ribbon and scrabble tiles.


  I actually had leftover ones from another project I did a few months ago.  So this was a great project to use the majority of them up.

  I purchased my tiles with the actual complete game of Scrabble at the thrift store.  You can however purchase just the tiles at various places.

For this project I assumed names pertaining to the holiday.


However you could easily make words pertaining to anything.  Based on what your going to use it for, when (holiday or not) and to whom your giving it too.


Glue the letters together and attach a ribbon.  You know have an ornament! Hang it on the Christmas tree, wall, a dresser knob, a gift tag for a present or even a rear view mirror.

 This was a super easy project to make; the hardest part was getting the tiles but once you get them you have unlimited possibilities.

I have a few of these ornaments left and what doesn't get distributed throughout the year will be given out for Christmas!

Be sure to keep following me as I share easy DIY projects.  Projects to keep or pass on as gifts.


Friday, December 11, 2015

Christmas Kids Crafts

  Taking it slow with kids and pain meds has finally slowed me down to do some crafts with my kids.  I have a ever growing board on pinterest.  Jump over there and see what projects  caught my eye or that I would like to make.  My Christmas pins are a collection of kid friendly crafts, decorations and DIY projects.

  Of course I have more than just a Christmas board.  You can find a DIY board, beautiful nail art, science projects for kids and more crafty things for different seasons and holidays.

  I will try to share the fails and wins with you.  I think it makes it easier to see real people accomplishing things rather than pretty, proper, perfect pictures.


  Today we worked on 2 crafts on my Christmas board and they came out pretty well.  The kids are satisfied with them.  A great preschool project.  Discuss colors, shapes, numbers with the Santa craft.  The stained glass project I was pleased with!  I think my daughter enjoyed seeing the end result too.  We will hang this up on the wall.  She showed great patience when coloring it and took her time.

supplies: tin foil, sharpie markers, coloring page, gallon baggie

supplies: red, white and black paper, red pompom, cottonball, paper plate, crayon to color face, glue

  My kids that made these are 3 and 5.  Supplies were very basic. Use what you have on hand improvise if you have to! My kids would give up TV and video games if they could make crafts.

Wednesday, December 9, 2015

Wordless Wednesday


  We bought a pass the last time we stayed in Williamsburg for +Colonial Williamsburg  so we decided to go one last time for the year.  I like this time of year as much as the spring.  When you visit Colonial Williamsburg multiple times you get the opportunity to see different things, performances, entry into a different home and even how the spruce up the homes be it wreaths in the winter or beautiful blossoms in the garden in the spring.

  So today I am sharing with you the variety of door displays to include wreaths and trimmings.  If you look closely you will see so many varieties of items.  From shoes, to iceskates, artichokes, apples, peppers and oranges.


  My family had a great time walking around looking at the sights and catching a little bit of history in action.  We even might have walked away with a bit more knowledge then what we arrived knowing.